下載CentOS6 X86-64BIT版
選DeskTop安裝模式
重開機後做基本設定
使用root登入視窗系統
這版網卡要自己手動啟用,請在視窗右上角點右鍵後點選System eth0啟用
編輯連線資訊
讓系統開機自動開啟網路:
一時興起下載了 CentOS-6.3-x86_64-minimal.iso 在 VBox 安裝起來,開機後竟然沒有網路可用。應是是預設沒有開啟,於是在網路上找到解法,要改網路設定檔,把開機啟動的選項設為 yes:
[root@lab ~]# cat /etc/sysconfig/network-scripts/ifcfg-eth0
DEVICE="eth0"
BOOTPROTO="dhcp"
HWADDR="08:00:27:61:6E:0B"
NM_CONTROLLED="yes"
ONBOOT="yes"
TYPE="Ethernet"
UUID="b8e9dffa-0733-4352-8803-900b9dde4bd2"
====================================================
在CENTOS中的防火牆開PORT,可利用下列指令完成(這邊我直接關閉):
#/sbin/iptables -I INPUT -p tcp –dport 10000 -j ACCEPT
上面指令是指,開PORT 10000可以讓外部存取。指令執行後,下列指令做儲存,以便下次開機也套用新值。
#/etc/rc.d/init.d/iptables save
正在儲存防火牆規則到 /etc/sysconfig/iptables: [ 確定 ]
另外可透過下列指令來查看現有防火牆的規則有那些:
#/etc/init.d/iptables status
重新啟動防火牆:
#/etc/init.d/iptables restart
停用防火牆,先查看那個LEVEL有開啟:
#chkconfig –list iptables
iptables 0:關閉 1:關閉 2:開啟 3:開啟 4:開啟 5:開啟 6:關閉
再依照上面的層級關閉,即停用。
#chkconfig –level 2345 iptables off
要再開啟的話:
#chkconfig iptables on
===================================================
設定YUM
YUM – Yellowdog Updater Modified
YUM 官方網站:http://linux.duke.edu/projects/yum/
修改設定檔:
cd /etc/yum.repos.d/
cp CentOS-Base.repo CentOS-Base.repo.bak
vi CentOS-Base.repo
:%s/mirror.centos.org\/centos/ftp.cse.yzu.edu.tw\/pub\/CentOS
或
:%s/mirror.centos.org\/centos/ftp.cs.pu.edu.tw\/Linux\/CentOS
將
mirror.centos.org/centos
換成
ftp.cse.yzu.edu.tw/pub/CentOS
或
ftp.cs.pu.edu.tw/Linux/CentOS
[base]
name=CentOS-$releasever – Base
#mirrorlist=http://mirrorlist.centos.org/?release=$releasever&arch=$basearch&repo=os
baseurl=http://ftp.cse.yzu.edu.tw/pub/CentOS/$releasever/os/$basearch/
gpgcheck=1
gpgkey=http://ftp.cse.yzu.edu.tw/pub/CentOS/RPM-GPG-KEY-CentOS-5
#released updates
[update]
name=CentOS-$releasever – Updates
#mirrorlist=http://mirrorlist.centos.org/?release=$releasever&arch=$basearch&repo=updates
baseurl=http://ftp.cse.yzu.edu.tw/pub/CentOS/$releasever/updates/$basearch/
gpgcheck=1
gpgkey=http://ftp.cse.yzu.edu.tw/pub/CentOS/RPM-GPG-KEY-CentOS-5
#packages used/produced in the build but not released
[addons]
name=CentOS-$releasever – Addons
#mirrorlist=http://mirrorlist.centos.org/?release=$releasever&arch=$basearch&repo=addons
baseurl=http://ftp.cse.yzu.edu.tw/pub/CentOS/$releasever/addons/$basearch/
gpgcheck=1
gpgkey=http://ftp.cse.yzu.edu.tw/pub/CentOS/RPM-GPG-KEY-CentOS-5
#additional packages that may be useful
[extras]
name=CentOS-$releasever – Extras
#mirrorlist=http://mirrorlist.centos.org/?release=$releasever&arch=$basearch&repo=extras
baseurl=http://ftp.cse.yzu.edu.tw/pub/CentOS/$releasever/extras/$basearch/
gpgcheck=1
gpgkey=http://ftp.cse.yzu.edu.tw/pub/CentOS/RPM-GPG-KEY-CentOS-5
更新:
yum -y update
==========================================================
安裝 vim-enhanced 加強 vi 的功能:
yum -y install vim-enhanced
mv /bin/vi /bin/vi.bak
ln -s /usr/bin/vim /bin/vi
echo "set nu" >> /etc/vimrc
#在檔案最後面新增 set nu,顯示行數
==========================================================
安裝完畢後重新開機進入視窗登入模式:
安裝GCC 套件 For VMware tools用
yum install kernel-devel kernel-headers gcc make
安裝VMware Tools
系統會自動掛載CDROM跳出VM tools程式,解壓縮它到任一目錄下
解壓縮到桌面
執行剛解好的目錄下的 vmware-install.pl
[root@Monitor yum.repos.d]# cd ~
[root@Monitor ~]# ls
anaconda-ks.cfg install.log install.log.syslog 下載 公用 圖片 影片 文件 桌面 範本 音樂
[root@Monitor ~]# cd 桌面
[root@Monitor vmware-tools-distrib]# ./vmware-install.pl
Creating a new VMware Tools installer database using the tar4 format.
Installing VMware Tools.
In which directory do you want to install the binary files?
[/usr/bin]
What is the directory that contains the init directories (rc0.d/ to rc6.d/)?
[/etc/rc.d]
What is the directory that contains the init scripts?
[/etc/rc.d/init.d]
In which directory do you want to install the daemon files?
[/usr/sbin]
In which directory do you want to install the library files?
[/usr/lib/vmware-tools]
The path "/usr/lib/vmware-tools" does not exist currently. This program is
going to create it, including needed parent directories. Is this what you want?
[yes]
In which directory do you want to install the documentation files?
[/usr/share/doc/vmware-tools]
The path "/usr/share/doc/vmware-tools" does not exist currently. This program
is going to create it, including needed parent directories. Is this what you
want? [yes]
The installation of VMware Tools 8.3.2 build-257589 for Linux completed
successfully. You can decide to remove this software from your system at any
time by invoking the following command: "/usr/bin/vmware-uninstall-tools.pl".
Before running VMware Tools for the first time, you need to configure it by
invoking the following command: "/usr/bin/vmware-config-tools.pl". Do you want
this program to invoke the command for you now? [yes]
Initializing…
Stopping VMware Tools services in the virtual machine:
Guest operating system daemon: [ 確定 ]
Virtual Printing daemon: [ 確定 ]
Unmounting HGFS shares: [ 確定 ]
Guest filesystem driver: [ 確定 ]
Found a compatible pre-built module for vmmemctl. Installing it…
Found a compatible pre-built module for vmhgfs. Installing it…
Found a compatible pre-built module for vmxnet. Installing it…
Found a compatible pre-built module for vmblock. Installing it…
Found a compatible pre-built module for vmci. Installing it…
Found a compatible pre-built module for vsock. Installing it…
Found a compatible pre-built module for vmxnet3. Installing it…
Found a compatible pre-built module for pvscsi. Installing it…
Detected X.org version 7.1.
Host resolution detected as "0 x 0".
Please choose one of the following display sizes that X will start with:
[1] "320×200"
[2] "320×240"
[3] "400×300"
[4] "512×384"
[5] "640×400"
[6] "640×480"
[7] "720×480"
[8] "800×480"
[9] "854×480"
[10] "720×576"
[11] "800×600"
[12] "1024×768"
[13] "1280×720"
[14] "1280×768"
[15] "1152×864"
[16] "1280×800"
[17] "1366×768"
[18] "1280×960"
[19] "1440×900"
[20] "1280×1024"
[21] "1400×1050"
[22] "1680×1050"
[23] "1600×1200"
[24] "1920×1080"
[25] "1920×1200"
[26] "1920×1440"
[27] "2048×1536"
[28] "2560×1600"
[29] "2560×1920"
Please enter a number between 1 and 29:
[3] 12
X Window System Version 7.1.1
Release Date: 12 May 2006
X Protocol Version 11, Revision 0, Release 7.1.1
Build Operating System: Linux 2.6.18-53.el5 i686 Red Hat, Inc.
Current Operating System: Linux mail1.winpex-gl.com 2.6.18-194.8.1.el5 #1 SMP Thu Jul 1 19:07:06 EDT 2010 i686
Build Date: 13 May 2010
Build ID: xorg-x11-server 1.1.1-48.76.el5_5.1
Before reporting problems, check http://wiki.x.org
to make sure that you have the latest version.
Module Loader present
Markers: (–) probed, (**) from config file, (==) default setting,
(++) from command line, (!!) notice, (II) informational,
(WW) warning, (EE) error, (NI) not implemented, (??) unknown.
(++) Log file: "/tmp/vmware-config0/XF86ConfigLog.4401", Time: Wed Aug 11 11:32:50 2010
(++) Using config file: "/tmp/vmware-config0/XF86Config.4401"
The XKEYBOARD keymap compiler (xkbcomp) reports:
> Warning: Multiple symbols for level 1/group 1 on key <I5F>
> Using XF86Sleep, ignoring XF86Standby
> Warning: Symbol map for key <I5F> redefined
> Using last definition for conflicting fields
Errors from xkbcomp are not fatal to the X server
X is running fine with the new config file.
FreeFontPath: FPE "unix/:7100" refcount is 2, should be 1; fixing.
Creating a new initrd boot image for the kernel.
Checking acpi hot plug [ 確定 ]
Starting VMware Tools services in the virtual machine:
Switching to guest configuration: [ 確定 ]
Paravirtual SCSI module: [ 確定 ]
Guest memory manager: [ 確定 ]
VM communication interface: [ 確定 ]
VM communication interface socket family: [ 確定 ]
Guest operating system daemon: [ 確定 ]
Virtual Printing daemon: [ 確定 ]
The configuration of VMware Tools 8.3.2 build-257589 for Linux for this running
kernel completed successfully.
You must restart your X session before any mouse or graphics changes take
effect.
You can now run VMware Tools by invoking the following command:
"/usr/bin/vmware-toolbox" during an X server session.
To enable advanced X features (e.g., guest resolution fit, drag and drop, and
file and text copy/paste), you will need to do one (or more) of the following:
1. Manually start /usr/bin/vmware-user
2. Log out and log back into your desktop session; and,
3. Restart your X session.
Enjoy,
–the VMware team
PieTTY、PtTTY:Microsoft Windows 下好用的 ssh 連線工具
PieTTY 官方網站:http://ntu.csie.org/~piaip/pietty/
下載:http://ntu.csie.org/~piaip/pietty/stable/pietty0327.exe
設定:
選項 / 字元編碼 / Unicode(圖一)
選項 / 亞洲語系修正 / 取消勾選「Unicode 亞洲寬符號字元」(圖二)
設定 ssh 連線安全限制
/etc/rc.conf 加入 sshd_enable="yes"
新增管理者帳號:
useradd mis
passwd mis
只允許管理者使用 ssh 登入:
cp /etc/ssh/sshd_config /etc/ssh/sshd_config.bak
vi /etc/ssh/sshd_config
AllowUsers mis
#在檔案最後面加上這一行,這樣就只有 mis 可以使用 ssh 連線了
#若要設定多人,就用空格隔開:AllowUsers mis mis2
注意:上面這個設定很重要,建議一定要做
重新讀取 ssh 設定檔:
/etc/rc.d/init.d/sshd restart
用 mis 帳號登入後,再用 su – 指令變成 root
三、網路基本設定
FQDN 設定:
hostname mail
vi /etc/hosts
vi /etc/sysconfig/network
DNS 設定:
vi /etc/resolv.conf
nameserver 10.10.10.1 <==指到內部的dns
nameserver 10.10.10.2
#nameserver 168.95.1.1
#nameserver 168.95.192.1
重新啟動網卡:
/etc/rc.d/init.d/network restart
四、tcp_wrappers 基本設定
vi /etc/hosts.deny
ALL:ALL
vi /etc/hosts.allow
ALL:10.10.0.0/255.255.0.0:allow
ALL:10.20.0.0/255.255.0.0:allow
sshd:10.10.0.0/255.255.0.0:allow
sshd:10.20.0.0/255.255.0.0:allow
postfix:ALL:allow
mailscanner:ALL:allow
單一IP設定法
ALL:220.130.47.91:allow
ALL:220.133.4.124:allow
五、關閉 SELinux
vi /etc/sysconfig/selinux
SELINUX=enforcing 改成–> SELINUX=disabled
六、關閉、啟動基本服務
執行 ntsysv 指令,只留下以下服務:
acpid
anacron
cpuspeed
crond
network
sshd
syslog
yum
八、自動校時 (記得防火牆要開 NPT 123 PORT)
yum -y install ntp
ntpdate watch.stdtime.gov.tw && clock -w
時間與頻率國家標準實驗室:http://www.stdtime.gov.tw/chinese/home.htm
NTP 校時軟體(for Windows):http://www.stdtime.gov.tw/chinese/EXE/NTPClock.exe
vi /etc/crontab
0 0-23 * * * root /usr/sbin/ntpdate watch.stdtime.gov.tw > /dev/null 2>&1
#每個小時校時一次
九、WEB server
Apache HTTP Server 官方網站:http://httpd.apache.org/
yum -y install httpd mod_ssl
cp /etc/httpd/conf/httpd.conf /etc/httpd/conf/httpd.conf.bak
vi /etc/httpd/conf/httpd.conf
250行 ServerAdmin root@localhost
354行 UserDir disable 修改成–> #UserDir disable 可開啟個人首頁這邊不開啟
361行 #UserDir public_html 修改成–> UserDir www
#將個人網頁資料夾改成由 public_html 改成 www,方便輸入
390行 DirectoryIndex index.html index.html.var 修改成–> DirectoryIndex index.html index.htm index.php index.html.var
730行 LanguagePriority zh-TW en ca cs da de el eo es et fr he hr it ja ko ltz nl nn no pl pt pt-BR ru sv zh-CN
746行 AddDefaultCharset UTF-8 修改成–> #AddDefaultCharset UTF-8
/etc/rc.d/init.d/httpd restart
chkconfig httpd on
十、Webmin:好用的web介面作業系統管理工具
Webmin 官方網站:http://www.webmin.com
抓新版
wget http://downloads.sourceforge.net/project/webadmin/webmin/1.600/webmin-1.600-1.noarch.rpm?r=http%3A%2F%2Fwww.webmin.com%2Fdownload.html&ts=1349770459&use_mirror=nchc
rpm -ivh webmin-1.600-1.noarch.rpm
若開不起來,看看是不是本機防火牆擋掉了,開啟10000 port
中文化設定:Webmin Configuration / Language / Traditional Chinese(ZH_TW.BIG5)
啟動 Webmin 的 SSL 支援:
yum -y install perl-Net-SSLeay
Webmin / Webmin 組態 / SSL加密 / 如果可用 SSL 的話啟用
Webmin 官方文件:http://www.webmin.com/index2.html
測試127.0.0.1 SNMP是否正常,並秀MIB資料
[root@localhost ~]# snmpwalk -v 2c -c public 127.0.0.1
安裝參考(一):
http://download.ithome.com.tw/article/index/id/288
軟體開箱文~~系統效能監控軟體Cacti 安裝
Cacti 執行環境建立
要安裝Cacti 程式之前請先確認系統的部分功能已經完成安裝,所包含的部分有php,MySQL,snmp等功能,如果沒有提供簡單的指令請先將這些功能建立好。
Step 1. 安裝php 程式執行環境。
[root@localhost ~]# yum -y install php php-devel php-snmp php-mysql
Step 2. 安裝mysql 資料庫軟體。
[root@localhost ~]# yum -y install mysql mysql-server mysql-devel
Step 3. 安裝snmp 訊息服務。
[root@localhost ~]# yum -y install net-snmp net-snmp-devel net-snmp-utils
Step 4. 取得rrdtool 第三方安裝套件。
這邊改抓64BIT版本
[root@localhost ~]# wget http://dag.wieers.com/rpm/packages/rpmforge-release/rpmforge-release-0.5.2-2.el6.rf.x86_64.rpm
Step 5. 使用rpm 安裝第三方支援套件。
[root@localhost ~]# rpm -Uvh rpmforge-release-0.5.2-2.el6.rf.x86_64.rpm
Step 6. yum 安裝rrdtool 程式。
[root@localhost ~]# yum -y install rrdtool
Step 7. 以上的軟體安裝完畢後請檢查檢查幾個項目是否有正確安裝,檢查的指令使用
[root@localhost ~]# php -m
Step 8. 需要檢查的項目mysql,snmp,xml,session,sockets。
[root@localhost ~]# php -m | grep mysql
[root@localhost ~]# php -m | grep snmp
[root@localhost ~]# php -m | grep xml
[root@localhost ~]# php -m | grep session
[root@localhost ~]# php -m | grep sockets
MySQL 資料庫服務安裝
確認都有安裝需要的套件後請啓動MySQL 服務,並且進行MySQL 資料庫設定。
Step 1. 啓動MySQL 資料庫服務。
[root@localhost ~]# service mysqld start
Step 2. 設定MySQL 資料庫管理密碼。
[root@localhost ~]# mysqladmin –user=root password <要設定的密碼>
PHPMYADMIN安裝與設定
[root@Monitor html]# yum install phpmyadmin
加入瀏覽權限
[root@Monitor html]# vi /etc/httpd/conf.d/phpmyadmin.conf
# Web application to manage MySQL
#
<Directory "/usr/share/phpmyadmin">
Order Deny,Allow
Deny from all
Allow from 127.0.0.1 10.10.10.0/16
</Directory>
Alias /phpmyadmin /usr/share/phpmyadmin
Alias /phpMyAdmin /usr/share/phpmyadmin
Alias /mysqladmin /usr/share/phpmyadmin
======================================
設定PHPMYADMIN連線認證方式
[root@cacti cacti]# vi /usr/share/phpmyadmin/config.inc.php
$cfg[‘blowfish_secret’] = ‘cookie’; //這個要設為 cookie 喔~
$cfg[‘Servers’][$i][‘auth_type’] = ‘http’;
/* User for advanced features */
$cfg[‘Servers’][$i][‘controluser’] = ‘root’;
$cfg[‘Servers’][$i][‘controlpass’] = ‘*設定你的root密碼*’;
===================================
問題: 無法登入
phpMyAdmin預設的登入方式為:『config』。此時需要事先將上述的帳號密碼修改正確。若想要在登錄時才輸入帳號密碼認證,則可以修改下列一行:
$cfg[‘Servers’][$i][‘auth_type’] = ‘cookie’; // (註:另外有http協定)
此時,會忽略 config.inc.php內之user / password 設定。
問題: 設定檔案現在需要密碼 (passphrase) (blowfish_secret).
$cfg[‘blowfish_secret’] = ‘cookie’; //這個要設為 cookie 喔~
問題: 找不到 PHP 內的 mbstring 編碼模組, 沒有這個模組, phpMyAdmin 無法準確地分割雙字元文字, 而可能產生問題.
安裝php5-mbstring, 于原始光碟片中的rpm資料夾中可以找到,直接執行即可.
問題: 無法讀取 mysql 模組,
請檢查 PHP 設定
http://rpmfind.net/linux/rpm2html/search.php?query=Mcrypt.so 下載
最好的辦法:
$cfg[‘Servers’][$i][‘auth_type’] = ‘http’;
/* User for advanced features */
$cfg[‘Servers’][$i][‘controluser’] = ‘root’;
$cfg[‘Servers’][$i][‘controlpass’] = ‘*設定你的root密碼*’;
匯入文字檔時,中文無法匯入
文字檔預設編碼為big5,可使用big5匯入或者將文字檔轉碼為utf8.
===================================
將CentOS 改為TEXT模式開機,節省記憶體使用:
[root@cacti ~]# vi /etc/inittab
5為視窗模式開機,改為3變文字模式
id:5:initdefault: ==> id:3:initdefault:
===================================
安裝Cacti 程式
Step 1. yum安裝cacti。
[root@Monitor html]# yum install cacti
Step 4. 建立cacti 資料庫
[root@localhost html]# mysqladmin –user=root –password=abcd1234 create cacti
Step 5. 切換到cacti 資料夾中(YUM安裝預設目錄)。
[root@Monitor www]# cd /var/www/cacti/
Step 6. 將cacti.sql 的資料表匯入到cacti 資料庫中。
[root@Monitor cacti]# mysql –user=root –password=winpex@29113637 cacti < cacti.sql
Step 7. GRANT 權限給其他的使用者。(這一個部分如果只有一個root 的使用者就可以先略過不設定。)
登入mysql 資料庫(直接給root管資料庫不修改)。
[root@localhost cacti]# mysql –user=root –password=密碼 mysql
Step 8. GRANT cacti 資料庫權限給Cacti 資料庫使用者(直接給root管資料庫不修改)。
mysql > GRANT ALL ON cacti.* TO 帳號@主機名稱(預設是localhost) IDENTIFIED BY ‘密碼’;
mysql > flush privileges;
mysql > exit
Step 9. 設定資料庫連線資訊。
[root@localhost cacti]# vim include/config.php
$database_type = "mysql";
$database_default = "cacti"; /* 設定資料庫名稱 */
$database_hostname = "localhost";
$database_username = "root"; /* 設定資料庫帳號 */
$database_password = "abcd1234"; /* 設定資料庫密碼 */
$database_port = "3306"; /* 設定資料庫連線的PORT */
$database_ssl = false;
Step 10. 設定防火牆開啓MySQL 資料庫通訊PORT(已用安裝參考二把這台的防火牆關閉,步驟可免)。
[root@localhost cacti]# vim /etc/sysconfig/iptables
-A RH-Firewall-1-INPUT -m state –state NEW -m tcp -p tcp –dport 3306 -j ACCEPT
Step 11. 重新啓動防火牆服務(也免做這步驟)。
[root@localhost cacti]# service iptables restart
Step 12. 修改rra 與log 資料夾擁有者。
[root@localhost cacti]# chown -R root.root rra/ log/
Step 13. 設定Cacti 的排程設定。
yum安裝cacti 已自動載入設定
[root@cacti cacti]# vi /etc/cron.d/cacti
*/5 * * * * cacti php /var/www/cacti/poller.php &>/dev/null
給網頁目錄權線
[root@cacti rra]# chown -R cacti.root /var/www/cacti/
完成Cacti 安裝進入首次使用設定畫面。
開放http目錄權限
[root@Monitor ~]# vi /etc/httpd/conf.d/cacti.conf
Alias /cacti/ /var/www/cacti/
<Directory /var/www/cacti/>
DirectoryIndex index.php
Options -Indexes
AllowOverride all
order deny,allow
deny from all
allow from 127.0.0.1 10.10.10.0/24
AddType application/x-httpd-php .php
php_flag magic_quotes_gpc on
php_flag track_vars on
</Directory>
[root@Monitor ~]# /etc/init.d/httpd restart
============
啟動HTTPD出錯誤訊息
Performing sanity check on apache22 configuration:
httpd: apr_sockaddr_info_get() failed for www.yourdomain.com
httpd2: Could not determine the server’s fully qualified domain name, using 127.0.0.1 for ServerName
查了許久,終於發現問題了
問題是出在lookup www.yourdomain.com時DNS認不得新的主機
解決方法:
檢查DNS設定是否正確
確認www.yourdomain.com 有正確的設定在/etc/hosts裡頭
初始設定的DNS設定為
# ::1 localhost domain.com
# 127.0.0.1 localhost domain.com
將其設成
::1 localhost yourdomain.com
127.0.0.1 localhost yourdomain.com
===============
Step 1. 連結http://10.10.10.25/cacti/ 連線Cacti 系統,並開始第一次使用設定。
Step 2. 設定安裝的類別,完成按下Next>>。
Step 3. 系統設定資訊不用去修改,就是使用目前的預設資訊即可。
Step 4. 輸入第一次登入的帳號密碼,Cacti 系統預設是admin/admin。
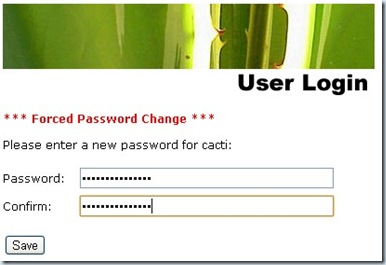
Step 5. 完成第一次登入之後Cacti 系統會強置要求你修改密碼。
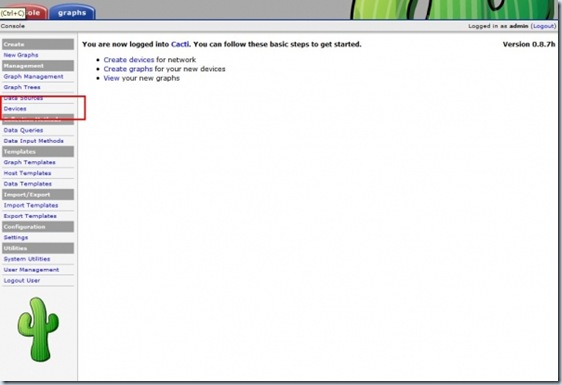
Step 6. Cacti 系統畫面,看到這邊表示已經安裝成功。
Cacti 是使用SNMP 的服務收集Cilent 端回覆的系統資訊,再將所獲得的系統資訊轉化成圖表跟系統狀態狀態資訊,完成了Cacti 的安裝還要設定好SNMP 的服務才可以開始收到需要的報表。
設定SNMP 分爲兩個部分,就是Client 端和Server 端兩段,設定的方式不同,但是都不會太困難只要依照指示將設定資訊設定在正確的位置上就可以了。
SNMP Server 端設定。
Step 1. 修改設定檔snmpd.conf。
[root@localhost ~]# vim /etc/snmp/snmpd.conf
view systemview included .1.3.6.1.2.1.1
view systemview included .1.3.6.1.2.1.2 /*新增設定值*/
view systemview included .1.3.6.1.2.1.25.1.1
設定的相關資訊。
Step 2. 修改增加SNMP 服務的PORT 服務(防火牆已關可省略)。
[root@localhost ~]# vim /etc/sysconfig/iptables
-A RH-Firewall-1-INPUT -m state –state NEW -m udp -p udp –dport 161 -j ACCEPT
Step 3. 重新啓動SNMP 服務。
root@localhost ~]# service snmpd restart
以上就完成了Server 端的設定,再來設定Client 端的資訊。
Step 1. 開啓設定檔案修改Client 設定資訊。
[root@localhost ~]# vim /etc/snmp/snmpd.conf
Step 2. 設定Server 端的IP 資訊Client 端的設定檔。
這裡我這樣設定:
com2sec local localhost public
com2sec mynetwork 10.20.0.0/16 public
com2sec mynetwork 10.10.0.0/16 public
com2sec mynetwork 10.11.0.0/16 public
com2sec mynetwork 10.12.0.0/16 public
com2sec mynetwork 10.13.0.0/16 public
com2sec mynetwork 10.14.0.0/16 public
com2sec mynetwork 10.15.0.0/16 public
com2sec mynetwork 10.200.0.0/16 public
Step 3. 修改group 的資訊。
這裡我這樣設定:
group MyRWGroup v1 local
group MyRWGroup v2c local
group MyRWGroup usm local
group MyROGroup v1 mynetwork
group MyRWGroup v1 otherv3user
Step 4. 修改view 的資訊。
view systemview included .1.3.6.1.2.1.2
view all included .1 80
Step 5. 修改access 資訊。
access MyROGroup "" any noauth exact all none none
access MyRWGroup "" any noauth exact all all none
Step 6. 在設定檔的最後面加上設定Client 回傳硬碟資訊。
disk / 10000
disk /dev/shm 10000
Step 7. 完成設定重新啓動SNMP 服務。
[root@localhost ~]# service snmpd restart
Step 8. 開啓防火牆SNMP 服務的PORT(已關防火牆)。
[root@localhost ~]# vim /etc/sysconfig/iptables
-A RH-Firewall-1-INPUT -m state –state NEW -m udp -p udp –dport 161 -j ACCEPT
Step 9. 重新啓動防火牆服務(已關防火牆)。
[root@localhost ~]# service iptables restart
建立監控圖表
Cacti 有提供一個最基本監控系統需要的資訊,設定的步驟還算簡單。
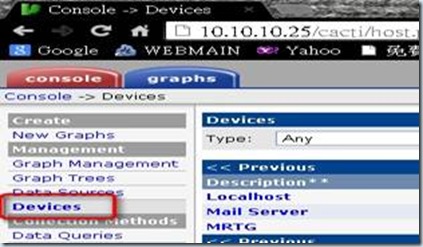
Step 1. 設定設備資訊,點選Console->Device。
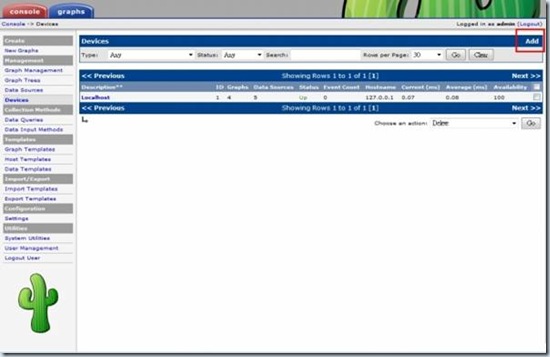
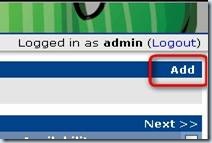
Step 2. 選擇Add 增加新的設備資訊。
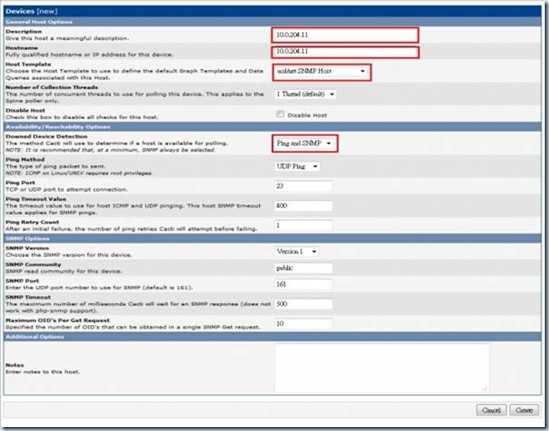
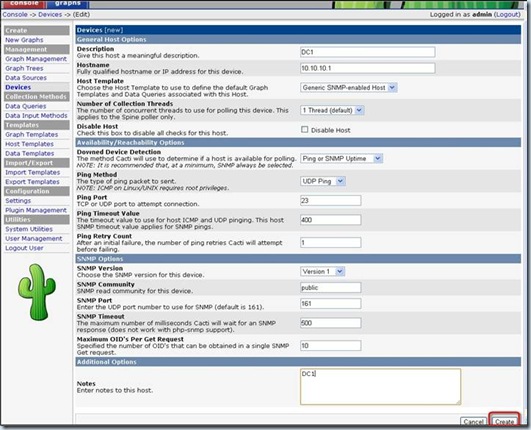
Step 3.在Description 輸入主機的名稱,Hostname 輸入主機的IP,HostTemplate選擇ucd/net SNMP Host,Down Device Detection 選擇Ping and SNMP 完成這幾個項目的設定再按下Create 按鈕產生新的主機。
加入Windows 監控:
安裝Windows SNMP服務:
打開Control Panel、Add or Remove Programs、Add/Remove Windows Components、Management and Monitoring Tools 、Details、Simple Network Management Protocol開始安裝。
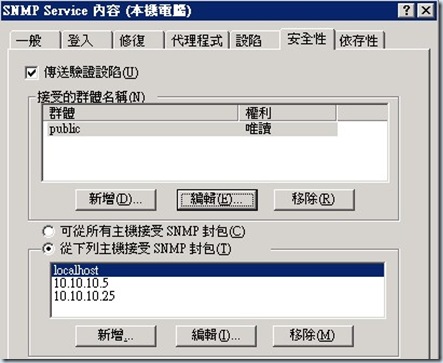
設定Windows SNMP服務:
我的電腦按右鍵 => 管理 => 服務 => 找到 “SNMP服務” 按右鍵選 “內容”
設定安全性如下
Ip列表內的主機才可抓到此台WINDOWS SNMP資料。
連入 Cacti 管理頁面新增Windows 監控主機
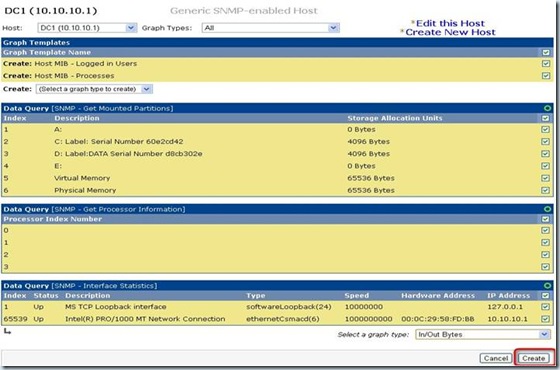
設定要監控的選項,這圖要監控Logged in Users與 Processes狀況
這圖要監控網路、處理器資訊、硬碟使用狀況
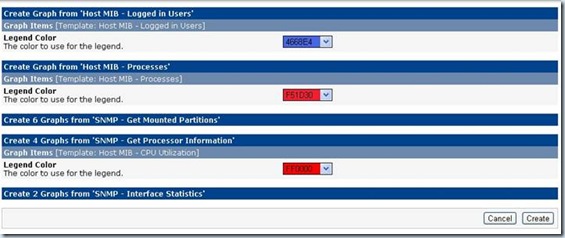
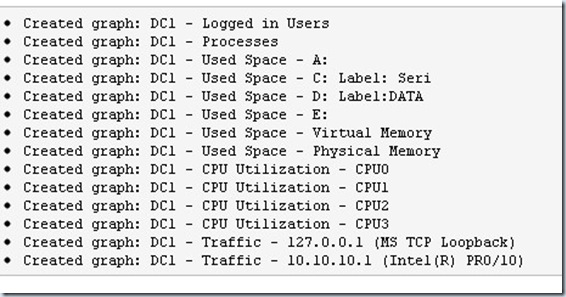
建立監控圖
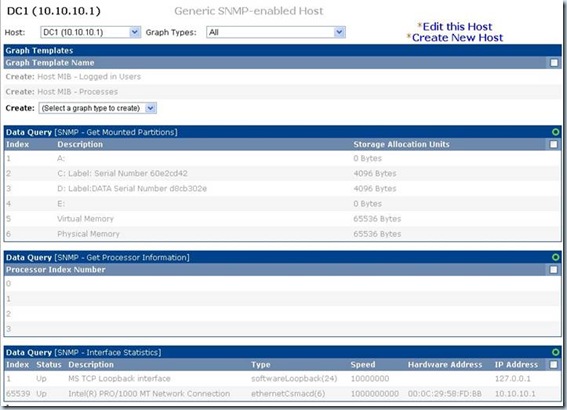
建立好的圖表選項會反灰
剛建好的主機 DC1
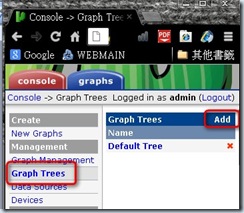
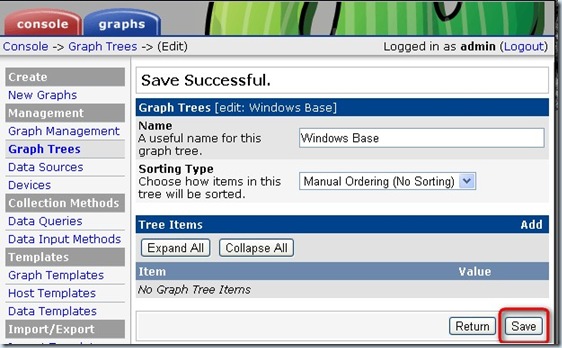
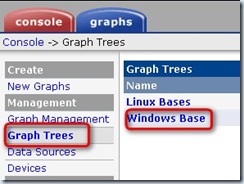
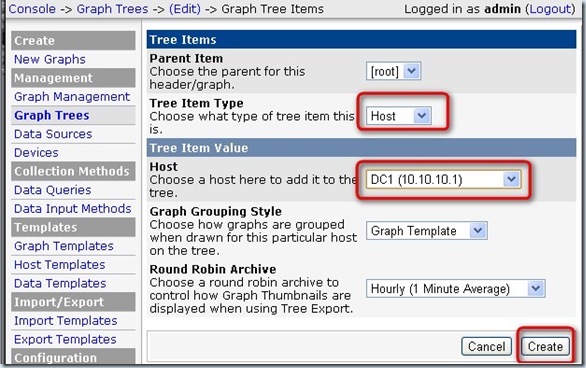
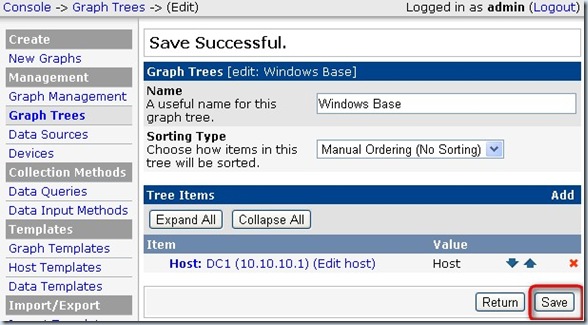
建立Windows 專用根目錄
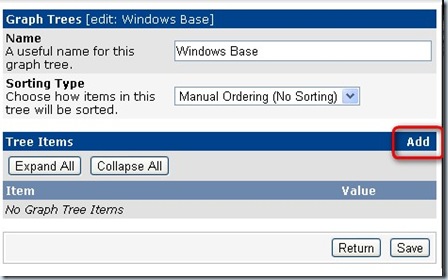
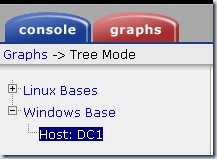
加入DC1到Windows 根目錄下:
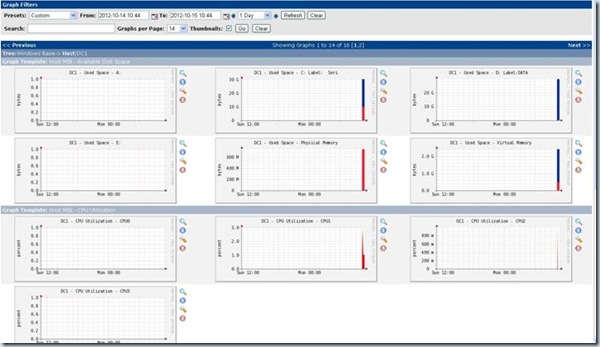
查看DC1狀態








近期留言